-40%
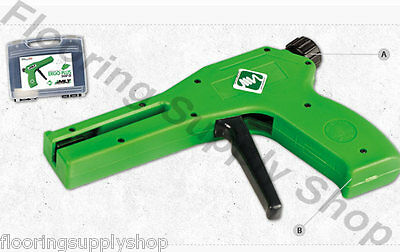
MLT Ergonomic Gun Tool for use with MLT tile leveling system
$ 100.29
- Description
- Size Guide
Description
MLT Ergonomic Gun ToolThis listing are only for the Gun
for spacers, Caps and other parts check our eBay Store at this link:
http://stores.ebay.com/FlooringSupplyShop/Tile-Lippage-Leveling-System-/_i.html?_fsub=819911919
-----
About
A. The ergo tool is made with a Tension dial which allows the pressure needed for different types of materials and situations, optimizing the performance of the system.
B. ergonomic handle
-----
Include
The tool is supplied in hard plastic box. Tool-holster included.
-----
Position Material Locking force
1 Marbles, stones Lbs ----- 52,91
2 Thin tiles Lbs ------------ 61,73
3 Regular porcelain Lbs --- 70,55
4 Regular porcelain Lbs --- 70,55
S Strap position -
MLT Systems introduces the industry’s latest technology in Mechanical Lippage Tuning. Consisting of three major components (Reusable Cap, Reusable Strap, and Base Plate), this system achieves the least amount of waste possible. With four different Base Plates to choose depending on the type of material, in addition to Cap accessories, such as the rubber foot for soft stone it allows the MLT Professional Lippage Tuning System to be tailored to each specific job.
-----
Features
Base Plates for Porcelain, Thin Tile, Porcelain, and Stone with even offset joints.
Caps can be used over 100 times and it also comes with a metal Long Life Kit so you can just pop these out if they wear after hundreds of uses. Reusable straps can be used multiple times, lowering overall expense
No need to pre-soak Base Plates
Rubber Feet and Steel Tongue Inserts for Caps avoid scratching and extend Cap life
Counter sink holes in Base Plates aid in fastening for ceiling applications
Base Plate design allows for maximum thinset coverage without hollow spots
The MLT lippage control system has one of the lowest "ongoing" cost components as the strap and cap is re-usable over and over its amazing quality. The straps are made with stainless steel so the thinset just falls off when it's dry. There is absolutely no waste material when used and when you clamp the two surfaces together, they meet smooth and perfectly flush each time.
MLT System Installation
1 Pre-soaking of system components in water is not required, for installation use.
2 Pre-assemble reusable connecting tab and base plate:
Push stainless steel portion of the re-usable connecting tab through the center opening of the selected base plate.
Align protuberances by passing them completely through the slotted openings of the stainless steel connecting tab.
Pull connecting tab until the "snap lock" engages.
Base plate should remain affixed to re-usable connecting tab unless separation is desired. To separate, simply reverse the snap lock procedure.
3. Insert pre-assembled re-usable connecting tab and base plate under the tile or stone edge, sliding the connecting tab's base plate under the tile or stone being installed, at approximately 3” from the corners (MLTSystem components may be used for the corners of an offset pattern, in the “T” intersection of porcelains having a minimum thickness of 3/8”).
4. Spacing of each re-usable connecting tab should not exceed 20” to 24” apart, during installation. Additional insertion of MLTSystem components may be used for increased lippage control.
5. When inserting the base plate under the side of the tile or stone, do not place them under a four-corner junction as lippage may result. Placement of base plates in a four-corner junction will also greatly increase the difficulty to produce a straight grout joint line. Once the preassembled re-usable connecting tab and base plate is in place, proceed using standard installation procedures.
6. Upon completing the "set" of the tile or stone, lower the tension locking cap over the re-usable connecting tab to tile or stone surface then, slide cap in direction of the grout joint to engage the lock.
7. Place installation/removal tool atop the tension locking cap to engage the re-usable connecting tab and tension MLT System, to create a lippage free surface.
8. If additional cleaning of grout joint line is required after MLT System has been tensioned: remove cap, clean joint line, re-engage cap and re-tension.
9. To remove the re-usable components of MLTSystem for following installations and to accommodate the grout procedure, always use the installation/removal tool.
Set tension setting dial on “S” for “Snap”
Place installation/removal tool atop re-usable cap and engage the re-usable connecting tab.
Squeeze tool trigger firmly to release reusable connecting tab from grout joint line.
If an occasional stubborn strap is encountered and seems unable to release:
Disengage and remove, re-usable tension locking cap.
Set installation/removal tool to 1 or 2, on the setting dial.
Place tool atop re-usable connecting tab and engage.
With tool engaged, move tool back and forth in direction of the joint line, towards the installed surface.
10. Collect and store all re-usable connecting tabs and re-usable tension locking caps, for future use. Cold Weather
Note:
Do not allow MLT System to freeze for minimum of 24 hours prior to use.
Protection Note:
When using MLT System for installations of thin tile, unglazed, or highly polished materials, it is strongly recommended to use the fitted Rubber Pad accessory under the re-usable tension locking cap.
-----
Shipping & Returns
USA SELLER - In stock - Ship Same Day
30 Days money back guarantee
-----
Contact Us
For help of any sort, contact us by selecting 'contact seller' option
Our physical store is open to the public
Mon – Fri 7:00 am – 5:00 pm
Sunday – 8:00 am – 12:00 pm
Visit our store for more products
http://stores.ebay.com/FlooringSupplyShop


